# Checking Executions and Allocating them to Trades
▶ Video Allocating fills (0:57) · all videos
## Overview
Quick reference for the day-to-day workflow of pulling executions from IB and booking them into a trade.
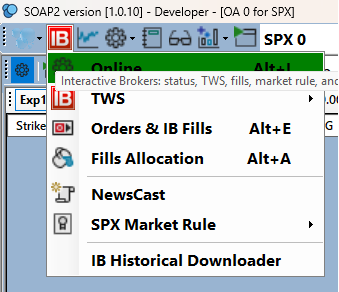
Two windows are involved: **Orders & IB Fills** (the Execs Log tab) and **Fills Allocation** (the Trade Allocations window).
 Allocating straight from Orders is faster if you already know which trade the fills belong to. Fills Allocation is the only place that lets you review/curate before booking, or handle multi-fill combo legs explicitly (weighted-average collation across partial fills) rather than saving them as separate raw rows. It carries its own **Symbol** selector, auto-loads executions when opened, lets you register a brand-new trade on the fly while allocating, and lets you curate exactly which fills go into a trade via the checkbox column.
---
## Walkthrough: booking a fresh execution into a new trade
A slower, narrated pass through the fast path (section 2A below), useful if you haven't touched this part of SOAP2 in a while. Uses the Orders window directly — no need to have an Options Analysis (OA) window open first.
1. **Open Orders.** Main toolbar → **Orders & IB Fills**, or the **Check Executions** button on an open OA. Either entry point works the same way — the right-click actions below don't depend on an OA being open.
2. **Pull executions.** Nothing shows up automatically for anything other than fills that occur *while you're connected* — IB only streams live fills as they happen, it doesn't proactively resend anything older. Set your filters (account/date/symbol) at the top if needed, then click **Refresh Executions**. Fills land in the Execs Log grid; commission and realized P&L usually follow a moment later as a separate message.
3. **Check the rows you want.** Every incoming row is ticked by default (the `EXECCHECK` column), except combo/BAG parent rows, which are greyed out and unticked automatically — only the individual legs underneath are allocatable. Untick anything that isn't part of this trade.
4. **Right-click a ticked row.** The context menu lists this symbol's existing trades (each expandable to show its current Trade Log entries) plus a **New Trade** item at the bottom.
5. **Pick New Trade.** SOAP creates a new trade name for the current symbol/account, writes the ticked rows to that trade's exec CSV, and updates the in-memory trade log. The status bar confirms with "Execution records saved to trade: \".
6. **Confirm it landed.** If you have an OA open for that symbol/account, it refreshes itself automatically — its trade dropdown now shows the new trade selected, and the grid shows the resulting position. If no OA is open, open one for the symbol (or the **Trade List** window) and the new trade will be there, fully populated — nothing further to do.
Once you're comfortable with this fast path, the fuller **Fills Allocation** window (section 2B) is worth learning next: it's the only place that lets you review/curate before booking, or handle multi-fill combo legs explicitly.
---
## How To (step-by-step)
1. Open **Fills Allocation** (main toolbar, or **Alt+A**).
2. Pick the **Account** and **Symbol** in the toolbar — the Symbol dropdown lists your Watchlist symbols and defaults to whatever symbol is current on the main window.
3. Executions load automatically the first time the window is activated for that symbol with nothing showing yet. If you switch symbols, or nothing came back, click **Load Execs** to (re)pull them.
4. In the executions grid, **untick** the checkbox on any row that shouldn't be allocated — e.g. real fills placed directly in TWS that have nothing to do with a SOAP-managed trade. Only ticked rows (and ticked legs within a combo) get staged.
5. Click **Select Exec Records** to move the ticked rows into the staging grid, or just skip this — clicking Allocate will auto-stage them if the staging grid is still empty.
6. Pick the destination trade:
- Click an existing trade's **row** in the Trades grid, **or**
- Select the **New Trade** placeholder row and type a name into the trade-name box.
7. Click **Allocate to Trade**. If you picked the New Trade placeholder, the trade is registered/saved automatically as part of this step — no separate "Validate Trade Name" click needed.
---
## 1. Pull executions into the Orders window
1. Open the **Orders** window (main toolbar → **Orders & IB Fills**, or the **Check Executions** button on an open OA). It has tabs for Live Orders, Completed Orders, and **Execs** (the executions log).
2. Set filters at the top if needed (account, date, sec type, exchange, client id) — the date dropdown limits results to "All available" or a specific day within the last 7 days (IB only retains 7 days of executions).
3. Click **Refresh Executions** (or use the menu *Request Executions*) to request an execution report from IB. Fills stream into the grid, and commission/realized P&L follow separately shortly after.
4. Combo (BAG) parent rows are shown grayed out and unchecked automatically — only the individual option legs are allocatable.
5. Executions are auto-checked as they arrive. Untick any rows you don't want to act on yet.
**Offline / historical executions:** new executions are appended to a per-symbol CSV cache (deduplicated by IB's ExecId). Use **Load Saved Execs** to reload that cache into the grid later, e.g. after IB's 7-day execution window has passed.
---
## 2. Two ways to allocate
### A. Quick allocate, straight from the Execs tab
1. Tick the rows you want (checkbox column) — right-click shows a running count in the status bar.
2. Right-click a ticked row: a context menu lists existing trades for the current symbol plus a **New Trade** option.
- Picking an existing trade opens a submenu of that trade's current Trade Log entries (for reference) and an **Add Execs to TLog below** action, which books the ticked execs straight in.
- **New Trade** creates a new trade name, gathers the ticked rows, and saves them to that trade. No Options Analysis (OA) window needs to be open for this — if one happens to be open for the symbol/account, it's refreshed automatically to show the new trade and its positions.
3. This is the fast path when you already know which trade the fills belong to.
### B. Full allocation workflow via Fills Allocation
Use this when you need to review/curate before booking, or handle combo legs explicitly. See the How To section above for the short version; details:
1. Open **Fills Allocation** (main toolbar, or **Alt+A**).
2. Pick the **Symbol** from the toolbar dropdown if it isn't already the one you want — this filters which trades show in the Trades grid and which execs get pulled. Changing it clears the current exec/staging grids (so you don't accidentally mix fills from two symbols) and triggers its own fresh auto-load.
3. **Load Execs**: pulls executions for the selected symbol into the allocation grid (same request as in Orders). This also fires automatically the first time the window is shown for a given symbol with nothing loaded yet. Existing Trade Log entries — e.g. loaded from a ONE report import — can also be listed here via **Load ONE TLog**.
4. **Curate with the checkbox column**: every row is ticked by default (except combo/BAG header rows, which are informational only and start unticked). Untick anything that shouldn't be part of this allocation — e.g. unrelated fills placed directly in TWS. Only ticked rows are staged; for a combo, only ticked legs/fills feed the aggregated leg quantity, price, and commission.
5. Select the fills to allocate (**Select Exec Records**, or just proceed to step 6 and let it auto-stage). This copies the ticked rows into the staging grid:
- Plain legs are copied 1:1.
- Combo (BAG) fills are **collated**: all ticked legs sharing the combo's ConId across multiple partial fills are summed into one row per leg (weighted average price, total qty, total commission/P&L).
6. Pick the destination trade in the **Trades** grid (one row per trade for the current account, plus a "New Trade" placeholder row):
- Click an **existing trade's row** to target it directly.
- Select the **New Trade** placeholder row and type a name into the trade-name box to create a new one.
7. Click **Allocate to Trade**. This:
- If the selected row is still the unsaved New Trade placeholder (blank Id), **registers it on the fly** — assigns a trade number, adds it to the trade list, and saves the trade list to disk — no separate "Validate Trade Name" click required.
- Builds the list of execution records from the staged rows.
- Resolves the trade number.
- Appends to the in-memory Trade Log for that trade if one is already loaded.
- Unchecks the source rows in the execution grid so they can't be double-allocated by mistake.
8. This saves the allocation, dedup'd by ExecId with a backup copy taken before writing, flips the trade's status from empty to active the first time it receives fills, refreshes the trade log dictionaries, and sets the trade as current.
---
## 3. Trade list housekeeping
- The account's trade list itself (name/status/etc., not the fills) is saved automatically on window close, or manually via **Save Trade List**.
- **Renaming a trade** (double-click its cell in the Trades grid and type a new name) renames its trade file on disk and pervades everywhere: the master trade list is updated, any currently open Options Analysis (OA) window for that symbol has its trade dropdown and active selection refreshed, and the Trade List window picks up the change next time it's brought to front. Renaming to a name already used by another trade is rejected (status bar shows "already exists") rather than silently colliding.
---
## Notes / gotchas
- Executions are keyed by IB `ExecId` everywhere — re-sent execs (e.g. IB replay after reconnect) update the existing row/record in place rather than duplicating it.
- The checkbox column is the actual curation mechanism for the Fills Allocation exec grid — an unticked row (or unticked leg/fill within a combo) is excluded from allocation, not just visually deselected.
- A trade must have a real name (not the placeholder "New Trade" row left untouched) and a valid account before anything will save.
- If you delete rows from the Execs Log grid (Delete key), the corresponding entries are removed from the recent-executions cache too — this does **not** touch anything already saved/allocated.
- The Orders window's own right-click **New Trade** (section 2A) does not require an Options Analysis window to be open — the trade number and default per-contract fee are resolved from the account's trade list and Accounts settings directly, not from an OA.
Related:
- [Trade List Guide](./TradeList.md.html)
---
Go back to the main [SOAP2 Help Guide](index.md.html).
Allocating straight from Orders is faster if you already know which trade the fills belong to. Fills Allocation is the only place that lets you review/curate before booking, or handle multi-fill combo legs explicitly (weighted-average collation across partial fills) rather than saving them as separate raw rows. It carries its own **Symbol** selector, auto-loads executions when opened, lets you register a brand-new trade on the fly while allocating, and lets you curate exactly which fills go into a trade via the checkbox column.
---
## Walkthrough: booking a fresh execution into a new trade
A slower, narrated pass through the fast path (section 2A below), useful if you haven't touched this part of SOAP2 in a while. Uses the Orders window directly — no need to have an Options Analysis (OA) window open first.
1. **Open Orders.** Main toolbar → **Orders & IB Fills**, or the **Check Executions** button on an open OA. Either entry point works the same way — the right-click actions below don't depend on an OA being open.
2. **Pull executions.** Nothing shows up automatically for anything other than fills that occur *while you're connected* — IB only streams live fills as they happen, it doesn't proactively resend anything older. Set your filters (account/date/symbol) at the top if needed, then click **Refresh Executions**. Fills land in the Execs Log grid; commission and realized P&L usually follow a moment later as a separate message.
3. **Check the rows you want.** Every incoming row is ticked by default (the `EXECCHECK` column), except combo/BAG parent rows, which are greyed out and unticked automatically — only the individual legs underneath are allocatable. Untick anything that isn't part of this trade.
4. **Right-click a ticked row.** The context menu lists this symbol's existing trades (each expandable to show its current Trade Log entries) plus a **New Trade** item at the bottom.
5. **Pick New Trade.** SOAP creates a new trade name for the current symbol/account, writes the ticked rows to that trade's exec CSV, and updates the in-memory trade log. The status bar confirms with "Execution records saved to trade: \".
6. **Confirm it landed.** If you have an OA open for that symbol/account, it refreshes itself automatically — its trade dropdown now shows the new trade selected, and the grid shows the resulting position. If no OA is open, open one for the symbol (or the **Trade List** window) and the new trade will be there, fully populated — nothing further to do.
Once you're comfortable with this fast path, the fuller **Fills Allocation** window (section 2B) is worth learning next: it's the only place that lets you review/curate before booking, or handle multi-fill combo legs explicitly.
---
## How To (step-by-step)
1. Open **Fills Allocation** (main toolbar, or **Alt+A**).
2. Pick the **Account** and **Symbol** in the toolbar — the Symbol dropdown lists your Watchlist symbols and defaults to whatever symbol is current on the main window.
3. Executions load automatically the first time the window is activated for that symbol with nothing showing yet. If you switch symbols, or nothing came back, click **Load Execs** to (re)pull them.
4. In the executions grid, **untick** the checkbox on any row that shouldn't be allocated — e.g. real fills placed directly in TWS that have nothing to do with a SOAP-managed trade. Only ticked rows (and ticked legs within a combo) get staged.
5. Click **Select Exec Records** to move the ticked rows into the staging grid, or just skip this — clicking Allocate will auto-stage them if the staging grid is still empty.
6. Pick the destination trade:
- Click an existing trade's **row** in the Trades grid, **or**
- Select the **New Trade** placeholder row and type a name into the trade-name box.
7. Click **Allocate to Trade**. If you picked the New Trade placeholder, the trade is registered/saved automatically as part of this step — no separate "Validate Trade Name" click needed.
---
## 1. Pull executions into the Orders window
1. Open the **Orders** window (main toolbar → **Orders & IB Fills**, or the **Check Executions** button on an open OA). It has tabs for Live Orders, Completed Orders, and **Execs** (the executions log).
2. Set filters at the top if needed (account, date, sec type, exchange, client id) — the date dropdown limits results to "All available" or a specific day within the last 7 days (IB only retains 7 days of executions).
3. Click **Refresh Executions** (or use the menu *Request Executions*) to request an execution report from IB. Fills stream into the grid, and commission/realized P&L follow separately shortly after.
4. Combo (BAG) parent rows are shown grayed out and unchecked automatically — only the individual option legs are allocatable.
5. Executions are auto-checked as they arrive. Untick any rows you don't want to act on yet.
**Offline / historical executions:** new executions are appended to a per-symbol CSV cache (deduplicated by IB's ExecId). Use **Load Saved Execs** to reload that cache into the grid later, e.g. after IB's 7-day execution window has passed.
---
## 2. Two ways to allocate
### A. Quick allocate, straight from the Execs tab
1. Tick the rows you want (checkbox column) — right-click shows a running count in the status bar.
2. Right-click a ticked row: a context menu lists existing trades for the current symbol plus a **New Trade** option.
- Picking an existing trade opens a submenu of that trade's current Trade Log entries (for reference) and an **Add Execs to TLog below** action, which books the ticked execs straight in.
- **New Trade** creates a new trade name, gathers the ticked rows, and saves them to that trade. No Options Analysis (OA) window needs to be open for this — if one happens to be open for the symbol/account, it's refreshed automatically to show the new trade and its positions.
3. This is the fast path when you already know which trade the fills belong to.
### B. Full allocation workflow via Fills Allocation
Use this when you need to review/curate before booking, or handle combo legs explicitly. See the How To section above for the short version; details:
1. Open **Fills Allocation** (main toolbar, or **Alt+A**).
2. Pick the **Symbol** from the toolbar dropdown if it isn't already the one you want — this filters which trades show in the Trades grid and which execs get pulled. Changing it clears the current exec/staging grids (so you don't accidentally mix fills from two symbols) and triggers its own fresh auto-load.
3. **Load Execs**: pulls executions for the selected symbol into the allocation grid (same request as in Orders). This also fires automatically the first time the window is shown for a given symbol with nothing loaded yet. Existing Trade Log entries — e.g. loaded from a ONE report import — can also be listed here via **Load ONE TLog**.
4. **Curate with the checkbox column**: every row is ticked by default (except combo/BAG header rows, which are informational only and start unticked). Untick anything that shouldn't be part of this allocation — e.g. unrelated fills placed directly in TWS. Only ticked rows are staged; for a combo, only ticked legs/fills feed the aggregated leg quantity, price, and commission.
5. Select the fills to allocate (**Select Exec Records**, or just proceed to step 6 and let it auto-stage). This copies the ticked rows into the staging grid:
- Plain legs are copied 1:1.
- Combo (BAG) fills are **collated**: all ticked legs sharing the combo's ConId across multiple partial fills are summed into one row per leg (weighted average price, total qty, total commission/P&L).
6. Pick the destination trade in the **Trades** grid (one row per trade for the current account, plus a "New Trade" placeholder row):
- Click an **existing trade's row** to target it directly.
- Select the **New Trade** placeholder row and type a name into the trade-name box to create a new one.
7. Click **Allocate to Trade**. This:
- If the selected row is still the unsaved New Trade placeholder (blank Id), **registers it on the fly** — assigns a trade number, adds it to the trade list, and saves the trade list to disk — no separate "Validate Trade Name" click required.
- Builds the list of execution records from the staged rows.
- Resolves the trade number.
- Appends to the in-memory Trade Log for that trade if one is already loaded.
- Unchecks the source rows in the execution grid so they can't be double-allocated by mistake.
8. This saves the allocation, dedup'd by ExecId with a backup copy taken before writing, flips the trade's status from empty to active the first time it receives fills, refreshes the trade log dictionaries, and sets the trade as current.
---
## 3. Trade list housekeeping
- The account's trade list itself (name/status/etc., not the fills) is saved automatically on window close, or manually via **Save Trade List**.
- **Renaming a trade** (double-click its cell in the Trades grid and type a new name) renames its trade file on disk and pervades everywhere: the master trade list is updated, any currently open Options Analysis (OA) window for that symbol has its trade dropdown and active selection refreshed, and the Trade List window picks up the change next time it's brought to front. Renaming to a name already used by another trade is rejected (status bar shows "already exists") rather than silently colliding.
---
## Notes / gotchas
- Executions are keyed by IB `ExecId` everywhere — re-sent execs (e.g. IB replay after reconnect) update the existing row/record in place rather than duplicating it.
- The checkbox column is the actual curation mechanism for the Fills Allocation exec grid — an unticked row (or unticked leg/fill within a combo) is excluded from allocation, not just visually deselected.
- A trade must have a real name (not the placeholder "New Trade" row left untouched) and a valid account before anything will save.
- If you delete rows from the Execs Log grid (Delete key), the corresponding entries are removed from the recent-executions cache too — this does **not** touch anything already saved/allocated.
- The Orders window's own right-click **New Trade** (section 2A) does not require an Options Analysis window to be open — the trade number and default per-contract fee are resolved from the account's trade list and Accounts settings directly, not from an OA.
Related:
- [Trade List Guide](./TradeList.md.html)
---
Go back to the main [SOAP2 Help Guide](index.md.html).